Kappa
“Great things are not done by impulse, but by a series of small things brought together.”
Hack The Box
POST
In the previous section, we saw how GET requests may be used by web applications for functionalities like search and accessing pages. However, whenever web applications need to transfer files or move the user parameters from the URL, they utilize POST requests.
Unlike HTTP GET, which places user parameters within the URL, HTTP POST places user parameters within the HTTP Request body. This has three main benefits:
- Lack of Logging: As POST requests may transfer large files (e.g. file upload), it would not be efficient for the server to log all uploaded files as part of the requested URL, as would be the case with a file uploaded through a GET request.
- Less Encoding Requirements: URLs are designed to be shared, which means they need to conform to characters that can be converted to letters. The POST request places data in the body which can accept binary data. The only characters that need to be encoded are those that are used to separate parameters.
- More data can be sent: The maximum URL Length varies between browsers (Chrome/Firefox/IE), web servers (IIS, Apache, nginx), Content Delivery Networks (Fastly, Cloudfront, Cloudflare), and even URL Shorteners (bit.ly, amzn.to). Generally speaking, a URL's lengths should be kept to below 2,000 characters, and so they cannot handle a lot of data.
So, let's see some examples of how POST requests work, and how we can utilize tools like cURL or browser devtools to read and send POST requests.
Login Forms
The exercise at the end of this section is similar to the example we saw in the GET section. However, once we visit the web application, we see that it utilizes a PHP login form instead of HTTP basic auth:
If we try to login with admin:admin, we get in and see a similar search function to the one we saw earlier in the GET section:
If we clear the Network tab in our browser devtools and try to log in again, we will see many requests being sent. We can filter the requests by our server IP, so it would only show requests going to the web application's web server (i.e. filter out external requests), and we will notice the following POST request being sent:
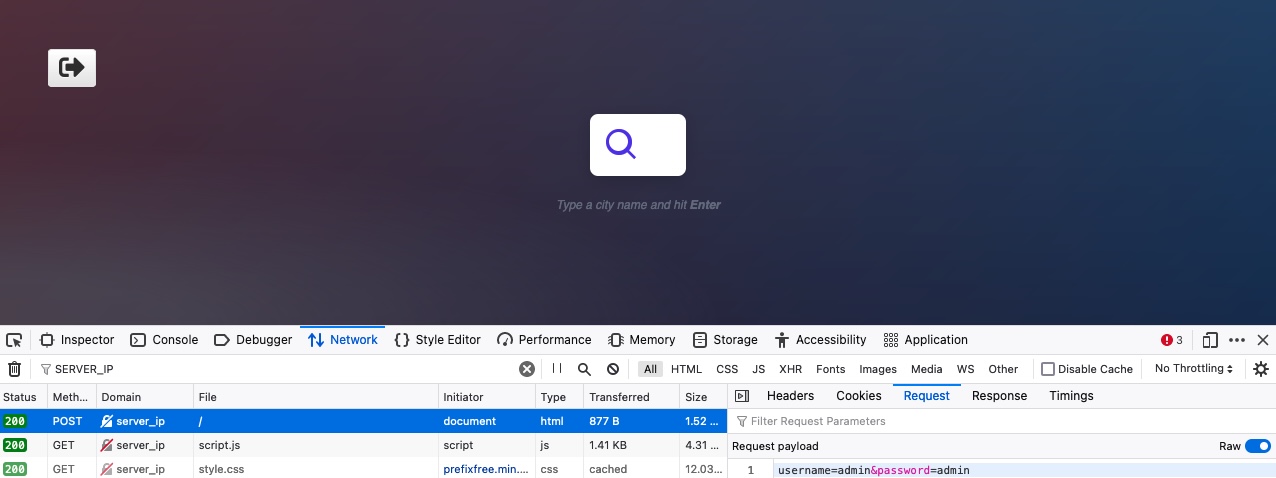
We can click on the request, click on the Request tab (which shows the request body), and then click on the Raw button to show the raw request data. We see the following data is being sent as the POST request data:
username=admin&password=admin
With the request data at hand, we can try to send a similar request with cURL, to see whether this would allow us to login as well. Furthermore, as we did in the previous section, we can simply right-click on the request and select Copy>Copy as cURL. However, it is important to be able to craft POST requests manually, so let's try to do so.
We will use the -X POST flag to send a POST request. Then, to add our POST data, we can use the -d flag and add the above data after it, as follows:
kappajester83@htb[/htb]$ curl -X POST -d 'username=admin&password=admin' http://"SERVER_IP":"PORT"/
If we examine the HTML code, we will not see the login form code, but will see the search function code, which indicates that we did indeed get authenticated.
Tip: Many login forms would redirect us to a different page once authenticated (e.g. /dashboard.php). If we want to follow the redirection with cURL, we can use the -L flag.
Authenticated Cookies
If we were successfully authenticated, we should have received a cookie so our browsers can persist our authentication, and we don't need to login every time we visit the page. We can use the -v or -i flags to view the response, which should contain the Set-Cookie header with our authenticated cookie:
kappajester83@htb[/htb]$ curl -X POST -d 'username=admin&password=admin' http://"SERVER_IP":"PORT"/ -i
HTTP/1.1 200 OK
Date:
Server: Apache/2.4.41 (Ubuntu)
Set-Cookie: PHPSESSID=c1nsa6op7vtk7kdis7bcnbadf1; path=/
With our authenticated cookie, we should now be able to interact with the web application without needing to provide our credentials every time. To test this, we can set the above cookie with the -b flag in cURL, as follows:
kappajester83@htb[/htb]$ curl -b 'PHPSESSID=c1nsa6op7vtk7kdis7bcnbadf1' http://"SERVER_IP":"PORT"/
As we can see, we were indeed authenticated and got to the search function. It is also possible to specify the cookie as a header, as follows:
kappajester83@htb[/htb]$ curl -H 'Cookie: PHPSESSID=c1nsa6op7vtk7kdis7bcnbadf1' http://"SERVER_IP":"PORT"/
We may also try the same thing with our browsers. Let's first logout, and then we should get back to the login page. Then, we can go to the Storage tab in the devtools with [SHIFT+F9]. In the Storage tab, we can click on Cookies in the left pane and select our website to view our current cookies. We may or may not have existing cookies, but if we were logged out, then our PHP cookie should not be authenticated, which is why we get the login form and not the search function:
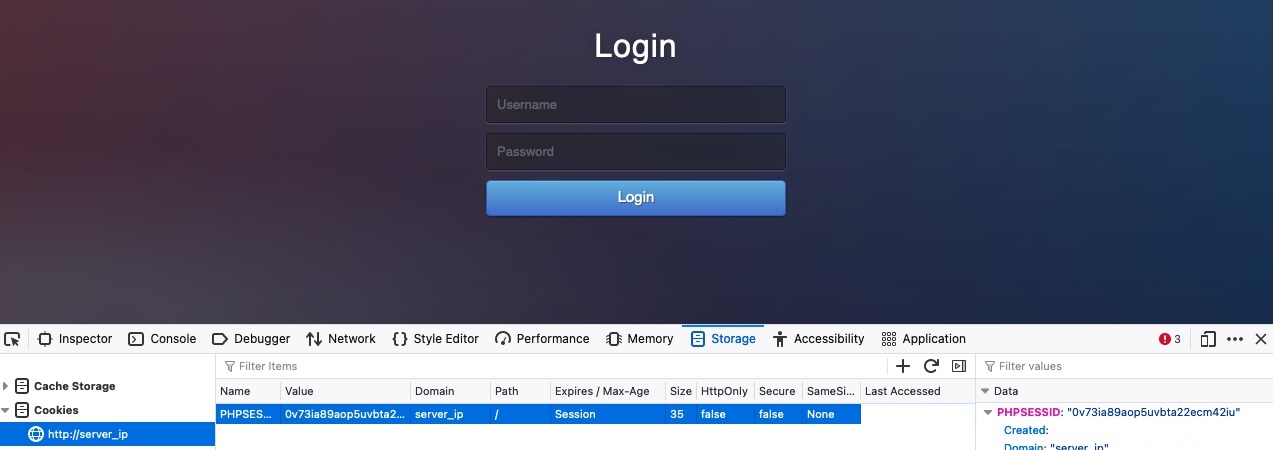
Now, let's try to use our earlier authenticated cookie, and see if we do get in without needing to provide our credentials. To do so, we can simply replace the cookie value with our own. Otherwise, we can right-click on the cookie and select Delete All, and the click on the + icon to add a new cookie. After that, we need to enter the cookie name, which is the part before the = (PHPSESSID), and then the cookie value, which is the part after the = (c1nsa6op7vtk7kdis7bcnbadf1). Then, once our cookie is set, we can refresh the page, and we will see that we do indeed get authenticated without needing to login, simply by using an authenticated cookie:
As we can see, having a valid cookie may be enough to get authenticated into many web applications. This can be an essential part of some web attacks, like Cross-Site Scripting.
JSON Data
Finally, let's see what requests get sent when we interact with the City Search function. To do so, we will go to the Network tab in the browser devtools, and then click on the trash icon to clear all requests. Then, we can make any search query to see what requests get sent:
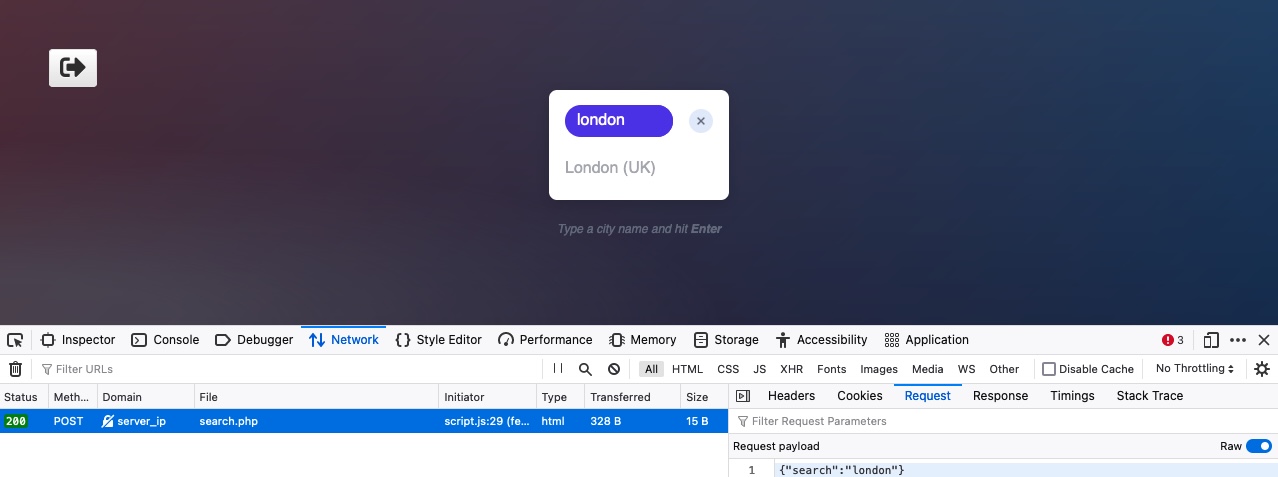
As we can see, the search form sends a POST request to search.php, with the following data:
{"search":"london"}
The POST data appear to be in JSON format, so our request must have specified the Content-Type header to be application/json. We can confirm this by right-clicking on the request, and selecting Copy>Copy Request Headers:
POST /search.php HTTP/1.1
Host: server_ip
User-Agent: Mozilla/5.0 (Macintosh; Intel Mac OS X 10.15; rv:97.0) Gecko/20100101 Firefox/97.0
Accept: */*
Accept-Language: en-US,en;q=0.5
Accept-Encoding: gzip, deflate
Referer: http://server_ip/index.php
Content-Type: application/json
Origin: http://server_ip
Content-Length: 19
DNT: 1
Connection: keep-alive
Cookie: PHPSESSID=c1nsa6op7vtk7kdis7bcnbadf1
Indeed, we do have Content-Type: application/json. Let's try to replicate this request as we did earlier, but include both the cookie and content-type headers, and send our request to search.php:
kappajester83@htb[/htb]$ curl -X POST -d '{"search":"london"}' -b
'PHPSESSID=c1nsa6op7vtk7kdis7bcnbadf1' -H 'Content-Type: application/json'
http://"SERVER_IP":"PORT"/search.php
["London (UK)"]
As we can see, we were able to interact with the search function directly without needing to login or interact with the web application front-end. This can be an essential skill when performing web application assessments or bug bounty exercises, as it is much faster to test web applications this way.
Exercise: Try to repeat the above request without adding the cookie or content-type headers, and see how the web app would act differently.
Finally, let's try to repeat the same above request by using Fetch, as we did in the previous section. We can right-click on the request and select Copy>Copy as Fetch, and then go to the Console tab and execute our code there:
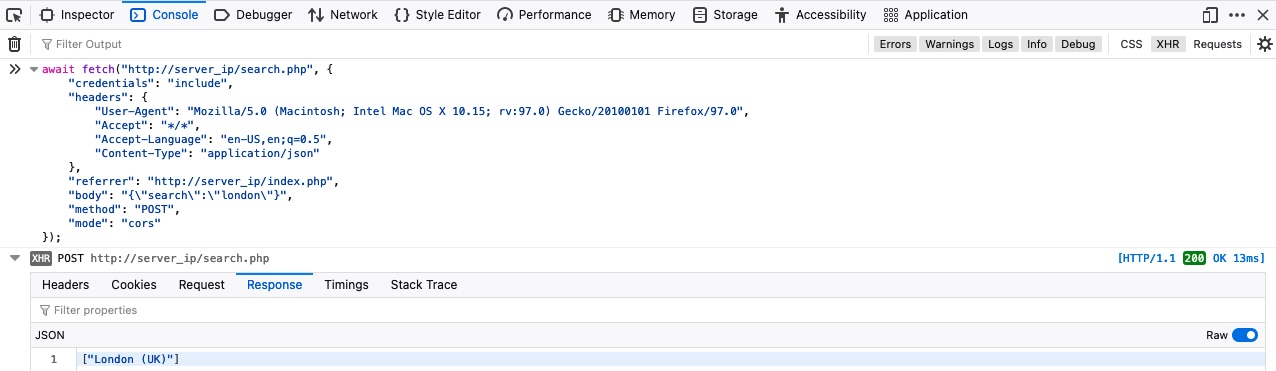
Our request successfully returns the same data we got with cURL. Try to search for different cities by directly interacting with the search.php through Fetch or cURL.
Questions
Answer the question(s) below to complete this Section and earn cubes!
- Authenticate to with user "admin" and password "admin"
- Obtain a session cookie through a valid login, and then use the cookie with cURL to search for the flag through a JSON POST request to '/search.php'